制作WDM驱动简单实例
Introduction
A lot of articles have been investigating in application layer issues, like skin-based dialogs, MFC, ATL, thread, process, registry etc. It won't be easy to find any driver related articles posted with full source code. The root cause is that most drivers are developed for specific hardware. Without the domain knowledge, you will never want to get in touch with it. I believe a lot of software engineers are afraid when they involve in kernel mode programming for the very first time, and there are not too much resources that can guide them through the whole process from DDK study to program stage. Hence I decided to share some of my experiences in driver programming in Windows. This demo focuses on a quick introduction to WDM Driver's architecture, and will introduce two I/O modes coming with Windows, which are Direct I/O and Buffered I/O, how to communicate with drivers residing in system kernel space, and read/write data to it.
There is no need for you to read the demo program with any hardware related background, the demo drivers are all pseudo drivers. That's drivers installed without a physical device in computer.
The member functions defined in this demo program can be used as templates for later driver development by you.
Background
You might be a well-experienced software engineer and might want to involve in kernel programming.
Create your WDM Driver: a Pseudo Driver tutorial
Before we start, declaration for member routines and structures is required. The most important driver-required data structure is - DEVICE_EXTENSION!
Hide Copy Code
typedef structtagDEVICE_EXTENSION { PDEVICE_OBJECT DeviceObject;// device object this driver createsPDEVICE_OBJECT NextDeviceObject;// next-layered device object in this// device stackDEVICE_CAPABILITIES pdc;// device capabilityIO_REMOVE_LOCK RemoveLock;// removal control locking structureLONG handles;// # open handlesPVOID DataBuffer;// Internal Buffer for Read/Write I/O UNICODE_STRING Device_Description; // Device DescriptionSYSTEM_POWER_STATE SysPwrState;// Current System Power StateDEVICE_POWER_STATE DevPwrState;// Current Device Power StatePIRP PowerIrp;// Current Handling Power-Related IRP } DEVICE_EXTENSION, *PDEVICE_EXTENSION;
Code segment below demonstrates the start of creating a valid WDM Driver.
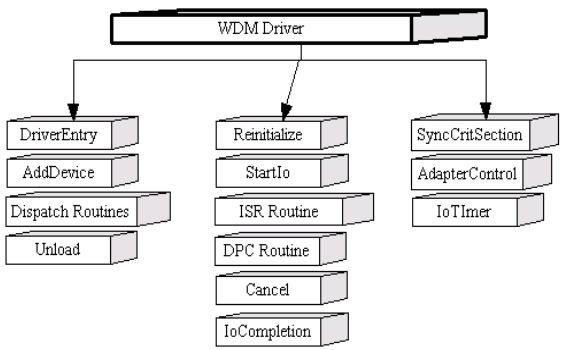
There are mandatory and optional members in a WDM Driver. A valid WDM Driver should come with the following member routines, the most important task item for DriverEntry is to register all member routines to kernel:
Hide Copy Code
// NTSTATUS DriverEntry( IN PDRIVER_OBJECT DriverObject, IN PUNICODE_STRING RegistryPath ) { RtlInitUnicodeString( &Global_sz_Drv_RegInfo, RegistryPath->Buffer); // Initialize function pointers DriverObject->DriverUnload = DriverUnload; DriverObject->DriverExtension->AddDevice = AddDevice; DriverObject->MajorFunction[IRP_MJ_CREATE] = PsdoDispatchCreate; DriverObject->MajorFunction[IRP_MJ_CLOSE] = PsdoDispatchClose; DriverObject->MajorFunction[IRP_MJ_READ] = PsdoDispatchRead; DriverObject->MajorFunction[IRP_MJ_WRITE] = PsdoDispatchWrite; DriverObject->MajorFunction[IRP_MJ_DEVICE_CONTROL] = PsdoDispatchDeviceControl; DriverObject->MajorFunction[IRP_MJ_POWER] = PsdoDispatchPower; DriverObject->MajorFunction[IRP_MJ_PNP] = PsdoDispatchPnP; return STATUS_SUCCESS; } //
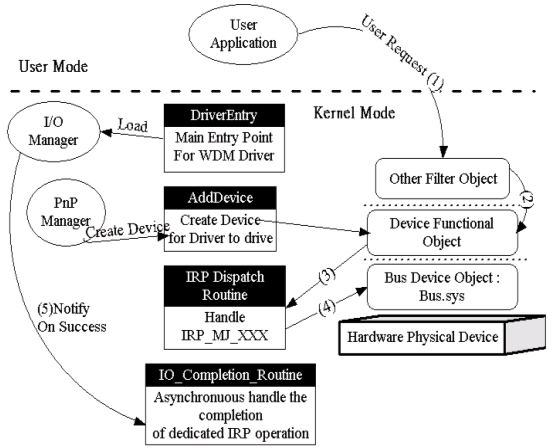
Normal operation workflow within WDM Driver
Code segment below demonstrates the workflow in AddDevice routine: the most important task for AddDeviceroutine is to create a Device object, and attach it to the existing device stack.
Hide Shrink  Copy Code
NTSTATUS AddDevice( IN PDRIVER_OBJECT DriverObject, IN PDEVICE_OBJECT PhysicalDeviceObject ) { ULONG DeviceExtensionSize; PDEVICE_EXTENSION p_DVCEXT; PDEVICE_OBJECT ptr_PDO; NTSTATUS status; RtlInitUnicodeString( &Global_sz_DeviceName, L"");//Get DEVICE_EXTENSION required memory space DeviceExtensionSize = sizeof(DEVICE_EXTENSION);//Create Device Objectstatus = IoCreateDevice( DriverObject, DeviceExtensionSize, &Global_sz_DeviceName, FILE_DEVICE_UNKNOWN, FILE_DEVICE_SECURE_OPEN, FALSE, &ptr_PDO );if (NT_SUCCESS(status)) { ptr_PDO->Flags &= ~DO_DEVICE_INITIALIZING; <font color="#ff0000"ptr_PDO->Flags |= DO_BUFFERED_IO;//For Buffered I/O//ptr_PDO->Flags |= DO_DIRECT_IO; //For Direct I/O</font>p_DVCEXT = ptr_PDO->DeviceExtension; p_DVCEXT->DeviceObject = ptr_PDO; RtlInitUnicodeString(/*//Other initialization tasks go here *///Store next-layered device object//Attach device object to device stackp_DVCEXT->NextDeviceObject = IoAttachDeviceToDeviceStack(ptr_PDO, PhysicalDeviceObject); }return status; }
Code segment below shows how to support IRP_MJ_CREATE, it is send when client application tries to connect to the underlying Pseudo Driver. Before proceeding, see graph below in advance to realize the connection process.
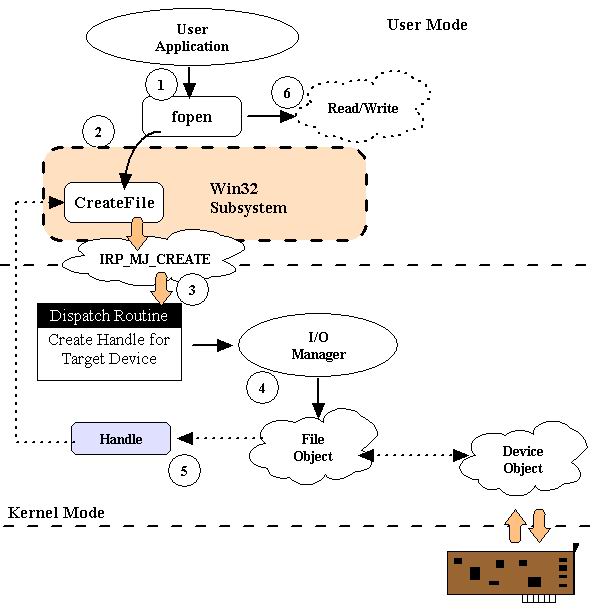
Usually, you will use CreateFile/fopen Win32 API to connect to the underlying device. It is the right time that Win32 Subsystem submits IRP_MJ_CREATE and asks driver to connect to the target device!
Hide Copy Code
NTSTATUS PsdoDispatchCreate( IN PDEVICE_OBJECT DeviceObject, IN PIRP Irp ) { PIO_STACK_LOCATION p_IO_STK; PDEVICE_EXTENSION p_DVCEXT; NTSTATUS status; p_IO_STK = IoGetCurrentIrpStackLocation(Irp); p_DVCEXT = DeviceObject->DeviceExtension; status = IoAcquireRemoveLock(&p_DVCEXT->RemoveLock, p_IO_STK->FileObject);if (NT_SUCCESS(status)) { CompleteRequest(Irp, STATUS_SUCCESS, 0);return STATUS_SUCCESS; } else { IoReleaseRemoveLock(&p_DVCEXT->RemoveLock, p_IO_STK->FileObject); CompleteRequest(Irp, status, 0);return status; } }
Code segment below shows how to support IRP_MJ_CLOSE, the IRP is sent when client application tries to close connection to the underlying Pseudo Driver. Before proceeding, see graph below in advance to realize the closing process.
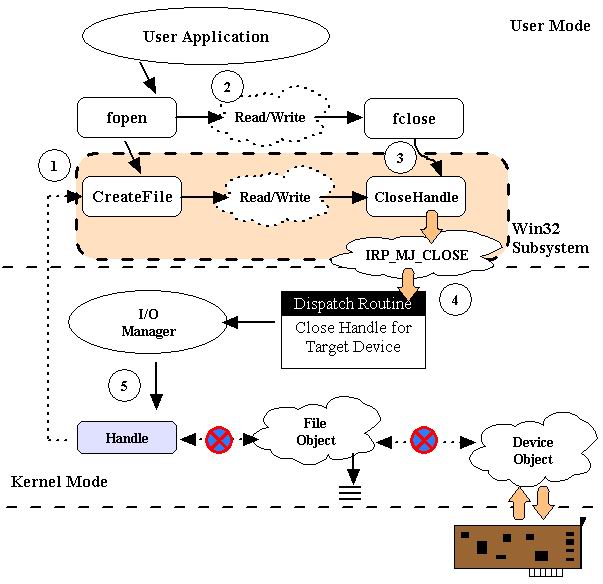
Usually, you will use CloseHandle/fclose Win32 API to close connection to the underlying device. It is the right time that Win32 Subsystem submits IRP_MJ_CLOSE and asks driver to close connection to target device!
Hide Copy Code
NTSTATUS PsdoDispatchClose( IN PDEVICE_OBJECT DeviceObject, IN PIRP Irp ) { PIO_STACK_LOCATION p_IO_STK; PDEVICE_EXTENSION p_DVCEXT; p_IO_STK = IoGetCurrentIrpStackLocation(Irp); p_DVCEXT = DeviceObject->DeviceExtension; IoReleaseRemoveLock(&p_DVCEXT->RemoveLock, p_IO_STK->FileObject); CompleteRequest(Irp, STATUS_SUCCESS, 0);return STATUS_SUCCESS; }
I/O Support : Buffered I/O Mode
There are three I/O modes in Windows kernel, they are Buffer, Direct and Neither modes. Now, we'll talk about Buffered I/O, and this article will not involve Neither mode for data transfer if processing under user-thread occupied memory space, it might be dangerous!! If client application is going to read/write data to and from driver, the memory address of data source will not be directly referenced by the underlying driver. System kernel will allocate another data buffer with equivalent size in kernel. All data transferred must be copied into this area before they are to the target place. Usually, you will call ReadFile/WriteFile or fread/fwrite to make read/write request.

Below code segment demos the workflow in I/O handle for read request. As we can see, the routine that is registered for reading is PsdoDispatchRead in DriverEntry, this member routine will read data out of Driver's internal member - DataBuffer to client application:
Hide Shrink  Copy Code
NTSTATUS PsdoDispatchRead( IN PDEVICE_OBJECT DeviceObject, IN PIRP Irp ) { PVOID Buf; //Buffer provided by user program ULONG BufLen; //Buffer length for user provided buffer LONGLONG Offset;//Buffer Offset PVOID DataBuf; //Buffer provided by Driver ULONG DataLen; //Buffer length for Driver Data Buffer ULONG ByteTransferred; PIO_STACK_LOCATION p_IO_STK; PDEVICE_EXTENSION p_DVCEXT; DbgPrint("IRP_MJ_READ : Begin\r\n");//Get I/o Stack Location & Device Extensionp_IO_STK = IoGetCurrentIrpStackLocation(Irp); p_DVCEXT = DeviceObject->DeviceExtension;//Get User Output Buffer & Length BufLen = p_IO_STK->Parameters.Read.Length; Offset = p_IO_STK->Parameters.Read.ByteOffset.QuadPart; Buf = (PUCHAR)(Irp->AssociatedIrp.SystemBuffer) + Offset;//Get Driver Data Buffer & LengthDataBuf = p_DVCEXT->DataBuffer;if (DataBuf == NULL) DataLen = 0else DataLen = 1024; IoAcquireRemoveLock(&p_DVCEXT->RemoveLock, Irp); DbgPrint("Output Buffer Length : %d\r\n", BufLen); DbgPrint("Driver Data Length : %d\r\n", DataLen);//if (BufLen <= DataLen) { ByteTransferred = BufLen; } else { ByteTransferred = DataLen; } RtlCopyMemory( Buf, DataBuf, ByteTransferred); IoReleaseRemoveLock(&p_DVCEXT->RemoveLock, Irp); CompleteRequest(Irp, STATUS_SUCCESS, ByteTransferred); DbgPrint("IRP_MJ_READ : End\r\n");return STATUS_SUCCESS; }
Below code segment demos the possible task items in workflow that can support the normal I/O requests to write data from application to driver.
Hide Shrink  Copy Code
NTSTATUS PsdoDispatchWrite( IN PDEVICE_OBJECT DeviceObject, IN PIRP Irp ) { PVOID Buf; //Buffer provided by user program ULONG BufLen; //Buffer length for user provided buffer LONGLONG Offset;//Buffer Offset PVOID DataBuf; //Buffer provided by Driver ULONG DataLen; //Buffer length for Driver Data Buffer ULONG ByteTransferred; PIO_STACK_LOCATION p_IO_STK; PDEVICE_EXTENSION p_DVCEXT; NTSTATUS status; DbgPrint("IRP_MJ_WRITE : Begin\r\n");//Get I/o Stack Location & Device Extensionp_IO_STK = IoGetCurrentIrpStackLocation(Irp); p_DVCEXT = DeviceObject->DeviceExtension;//Get User Input Buffer & Length BufLen = p_IO_STK->Parameters.Write.Length; Offset = p_IO_STK->Parameters.Read.ByteOffset.QuadPart; Buf = (PUCHAR)(Irp->AssociatedIrp.SystemBuffer) + Offset;//Get Driver Data Buffer & Length DataBuf = p_DVCEXT->DataBuffer; DataLen = 1024; IoAcquireRemoveLock(&p_DVCEXT->RemoveLock, Irp); DbgPrint("Input Buffer Length : %d\r\n", BufLen); DbgPrint("Driver Data Length : %d\r\n", DataLen);if (BufLen <= DataLen) { ByteTransferred = BufLen; } else{ ByteTransferred = DataLen; } ByteTransferred = BufLen; RtlZeroMemory( p_DVCEXT->DataBuffer,1024); RtlCopyMemory( DataBuf, Buf, ByteTransferred); IoReleaseRemoveLock(&p_DVCEXT->RemoveLock, Irp); CompleteRequest(Irp, STATUS_SUCCESS, ByteTransferred); DbgPrint("IRP_MJ_WRITE : End\r\n");return STATUS_SUCCESS; }
I/O Support : Direct I/O Mode
Below graph exhibits how Direct I/O mode is supported when data is transferred between client application and driver. Under Direct I/O mode, Memory Manager will create MDL (Memory Descriptor List) to reference the physical address taken by user-provided buffer, all data can be directly referenced via MDL from kernel environment.
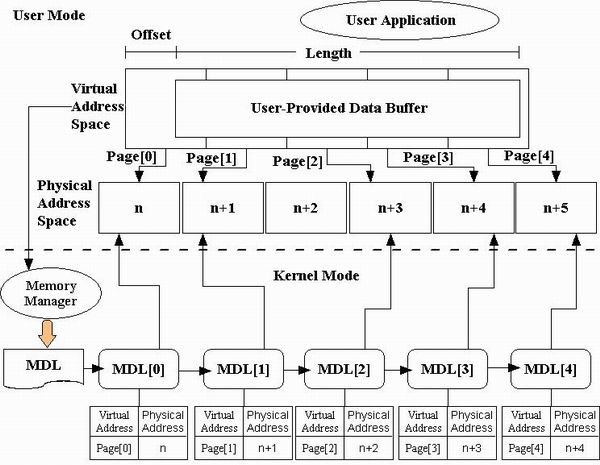
In DDK, some MMXxx routines are provided to help you to get MDL that maps to physical address of user-provided buffer.
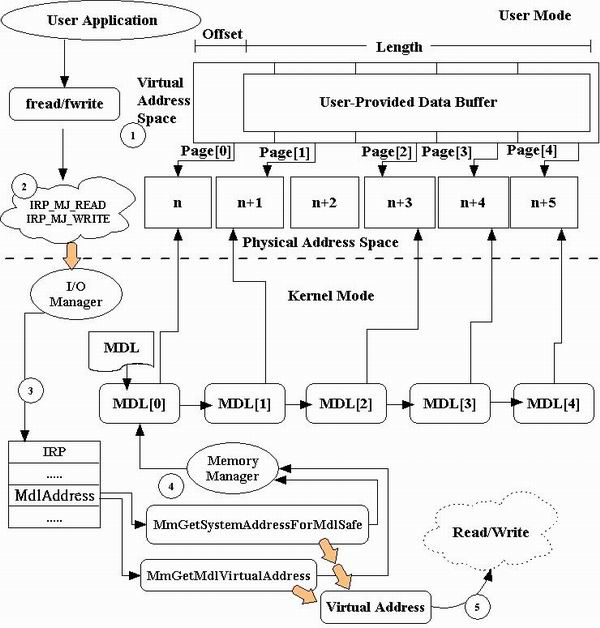
Below code segment contains the statements that can support data reading under Direct I/O mode. It is achieved by Mmxxx routine, please read it carefully, and you can also find the full code in the zip file. The most important MmXxx you will use in this mode should be - MmGetSystemAddressForMdlSafe, it can obtain the MDL that references the physical address of user-buffer.
Hide Shrink  Copy Code
NTSTATUS PsdoDispatchRead( IN PDEVICE_OBJECT DeviceObject, IN PIRP Irp ) { PVOID Buf; //Buffer provided by user program ULONG BufLen; //Buffer length for user provided buffer ULONG Offset;//Buffer Offset PVOID DataBuf; //Buffer provided by Driver ULONG DataLen; //Buffer length for Driver Data Buffer ULONG ByteTransferred; PIO_STACK_LOCATION p_IO_STK; PDEVICE_EXTENSION p_DVCEXT; DbgPrint("IRP_MJ_READ : Begin\r\n");//Get I/o Stack Location & Device Extensionp_IO_STK = IoGetCurrentIrpStackLocation(Irp); p_DVCEXT = DeviceObject->DeviceExtension;//Get User Output Buffer & Length Buf = MmGetSystemAddressForMdlSafe( Irp->MdlAddress, HighPagePriority);if (Buf == NULL) { DbgPrint("Can't get Virtual Address from MDL\r\n");returnSTATUS_INSUFFICIENT_RESOURCES; } BufLen = MmGetMdlByteCount(Irp->MdlAddress); Offset = MmGetMdlByteOffset(Irp->MdlAddress);//Get Driver Data Buffer & LengthDataBuf = p_DVCEXT->DataBuffer;if (DataBuf == NULL) DataLen = 0else DataLen = 1024; IoAcquireRemoveLock(&p_DVCEXT->RemoveLock, Irp); DbgPrint("Output Buffer Length : %d\r\n", BufLen); DbgPrint("Offset for Buffer in the Memory Page: %d\r\n", Offset); DbgPrint("Driver Data Length : %d\r\n", DataLen);//if (BufLen <= DataLen) { ByteTransferred = BufLen; } else { ByteTransferred = DataLen; } RtlCopyMemory( Buf, DataBuf, ByteTransferred); IoReleaseRemoveLock(&p_DVCEXT->RemoveLock, Irp); CompleteRequest(Irp, STATUS_SUCCESS, ByteTransferred); DbgPrint("IRP_MJ_READ : End\r\n");return STATUS_SUCCESS; }
Below code segment demos the possible workflow to write data from user application to driver:
Hide Shrink  Copy Code
NTSTATUS PsdoDispatchWrite( IN PDEVICE_OBJECT DeviceObject, IN PIRP Irp ) { PVOID Buf; //Buffer provided by user program ULONG BufLen; //Buffer length for user provided buffer ULONG Offset;//Buffer Offset PVOID DataBuf; //Buffer provided by Driver ULONG DataLen; //Buffer length for Driver Data Buffer ULONG ByteTransferred; PIO_STACK_LOCATION p_IO_STK; PDEVICE_EXTENSION p_DVCEXT; NTSTATUS status; DbgPrint("IRP_MJ_WRITE : Begin\r\n");//Get I/o Stack Location & Device Extensionp_IO_STK = IoGetCurrentIrpStackLocation(Irp); p_DVCEXT = DeviceObject->DeviceExtension;//Get User Input Buffer & Length Buf = MmGetSystemAddressForMdlSafe( Irp->MdlAddress, HighPagePriority);if (Buf == NULL) { DbgPrint("Can't get Virtual Address from MDL\r\n");returnSTATUS_INSUFFICIENT_RESOURCES; } BufLen = MmGetMdlByteCount(Irp->MdlAddress); Offset = MmGetMdlByteOffset(Irp->MdlAddress);//Get Driver Data Buffer & Length DataBuf = p_DVCEXT->DataBuffer; DataLen = 1024; IoAcquireRemoveLock(&p_DVCEXT->RemoveLock, Irp); DbgPrint("Input Buffer Length : %d\r\n", BufLen); DbgPrint("Offset for Buffer in the Memory Page: %d\r\n", Offset); DbgPrint("Driver Data Length : %d\r\n", DataLen);if (BufLen <= DataLen) { ByteTransferred = BufLen; } else{ ByteTransferred = DataLen; } ByteTransferred = BufLen; RtlZeroMemory( p_DVCEXT->DataBuffer,1024); RtlCopyMemory( DataBuf, Buf, ByteTransferred); IoReleaseRemoveLock(&p_DVCEXT->RemoveLock, Irp); CompleteRequest(Irp, STATUS_SUCCESS, ByteTransferred); DbgPrint("IRP_MJ_WRITE : End\r\n");return STATUS_SUCCESS; }
Contents of the source zip package
The zip file contains below subfolders:
Application: it contains the client applications to the Pseudo Driver.
bin: it contains the install/uninstall utility for Pseudo Driver.
BufferedIO_PW: it is where the Pseudo Driver that employees Buffered I/O mode for read/write resides.
DirectIO_PW: it is where the Pseudo Driver that employees Direct I/O Mode for read/write resides.
IOCTL_PW: it is where the Pseudo Driver that simply supports user-defined I/O Control Code resides.
ShareFiles: it is the common shared library for PnP, Power Management, I/O completion.
Install: it contains the source code of install/uninstall utility. (Install utility is directly referenced from DDK's sample, I won't provide redundant copy of it, only the uninstall utility source code is provided in it).
How to build the Pseudo Driver?
Unzip the package to some folder you'd like it to be, let's name it ROOT_OF_SOURCE.
Select Start->Programs->Development Kits->Windows DDK xxxx.xxxx->Build Environments->Free Build. (This is for free release without debug information in it.)
Enter ROOT_OF_SOURCE\SharedFiles subfolder, enter build -cefw, it all goes well, shared library will be generated.
Enter ROOT_OF_SOURCE\BufferedIO_PW subfolder, enter build -cefw, it will create Pseudo Driver - BufferDrv.sys. Copy this file into ROOT_OF_SOURCE\BufferedIO_PW\Install if you have made add-in for any new features, the copy is for later driver install.
Enter ROOT_OF_SOURCE\DirectIO_PW subfolder, enter build -cefw, it will create Pseudo Driver - DirectDrv.sys. Copy this file into ROOT_OF_SOURCE\DirectIO_PW\Install if you have made add-in for any new features, the copy is for later driver install.
Enter ROOT_OF_SOURCE\IOCTL_PW subfolder, enter build -cefw, it will create Pseudo Driver - PseudoDrv.sys. Copy this file into ROOT_OF_SOURCE\IOCTL_PW\Install if you have made add-in for any new features, the copy is for later driver install.
Install Pseudo Driver into system (XP)
Unzip the source file, launch DOS prompt-console.
Enter into bin subfolder.
Execute DevInst.bat, it will automatically install the Pseudo Driver into your system.
Uninstall Pseudo Driver from system (XP)
Enter into bin subfolder.
Execute DevRemove.bat, it will automatically uninstall all-driver related resources from your system.
Execute client application
You can enter into ROOT_OF_SOURCE\Application subfolder, execute bufferclient.exe, directclient.exe, and clientapp.exe to verify if the three Pseudo Drivers have been installed successfully.
Known Issues
The install/uninstall of Pseudo Driver won't wok on Window 2000, the root cause might be that the Setup API doesn't work on Window 2000, can't allow driver installed without a physical hardware in it. Can anybody help to resolve it? Many Thanks.
If you'd like to install/uninstall the Pseudo Driver in Windows 2000, you will need to launch New Hardware Wizard from within Device Manager, and select to install new hardware->Display all hardware->Install from disk->"ROOT_OF_SOURCE\BufferedIO_PW\Install", click on OK button. New Hardware Wizard will install Buffered I/O Pseudo Driver. (This is for Buffered I/O demo driver install. As for Direct I/O, please set source directory to "ROOT_OF_SOURCE\DirectIO_PW\Install").
Reboot is required if the driver has been reinstalled after un-installation. I don't know why this happened, I hope somebody can inform me. Many Thanks.
Future Directions for Pseudo Driver
Fix above issues.
WMI support in Pseudo Driver will be added-in.